
Các nội dung chính
Tạo bố cục ứng dụng
Ứng dụng chỉ có duy nhất một RecyclerView, vậy thêm vào RecyclerView xml layout chính.
Tệp activity_main.xml
<?xml version="1.0" encoding="utf-8"?>
<LinearLayout xmlns:android="http://schemas.android.com/apk/res/android"
    xmlns:app="http://schemas.android.com/apk/res-auto"
    xmlns:tools="http://schemas.android.com/tools"
    android:layout_width="match_parent"
    android:layout_height="match_parent"
    tools:context=".MainActivity">
    <androidx.recyclerview.widget.RecyclerView
        android:id="@+id/rycViewSubject"
        android:layout_width="match_parent"
        android:layout_height="match_parent" />
</LinearLayout>
Tạo bố cục cho mỗi hàng
Trong ví dụ này, đơn giản Mỗi hàng trong RecyclerViewsẽ chỉ có một duy nhất TextView. Do vậy ta tạo tệp layout mới.
Tệp recyclerview_row_item.xml
<?xml version="1.0" encoding="utf-8"?>
<LinearLayout xmlns:android="http://schemas.android.com/apk/res/android"
    xmlns:app="http://schemas.android.com/apk/res-auto"
    xmlns:tools="http://schemas.android.com/tools"
    android:layout_width="match_parent"
    android:layout_height="match_parent"
    tools:context=".MainActivity">
    <androidx.recyclerview.widget.RecyclerView
        android:id="@+id/rycViewSubject"
        android:layout_width="match_parent"
        android:layout_height="match_parent" />
</LinearLayout>
Tạo bộ điều hợp Adapter
Tệp: MyRecyclerViewAdapter .java
package vn.edu.ntu.vidurecycleview_simpletext;

import android.content.Context;
import android.view.LayoutInflater;
import android.view.View;
import android.view.ViewGroup;
import android.widget.TextView;

import androidx.annotation.NonNull;
import androidx.recyclerview.widget.RecyclerView;

import java.util.List;

public class MyRecyclerViewAdapter extends RecyclerView.Adapter<MyRecyclerViewAdapter.MyItemViewHolder>{
    private List<String> mSubjectList;
    private LayoutInflater mInflater;

    public MyRecyclerViewAdapter(Context mContext,List<String> mSubjectList) {
        this.mSubjectList = mSubjectList;
        this.mInflater = LayoutInflater. from(mContext);
    }

    @NonNull
    @Override
    public MyItemViewHolder onCreateViewHolder(@NonNull ViewGroup parent, int viewType) {
        View view = mInflater.inflate(R.layout.recyclerview_row_item, parent, false);
        return new MyItemViewHolder(view);
    }

    @Override
    public void onBindViewHolder(@NonNull MyItemViewHolder holder, int position) {
        String subject = mSubjectList.get(position);
        holder.myTextView_SubjectName.setText(subject);
    }

    @Override
    public int getItemCount() {
        return mSubjectList.size();
    }

    class  MyItemViewHolder extends RecyclerView.ViewHolder {
        TextView myTextView_SubjectName;
        MyItemViewHolder (View view) {
            super(view);
            myTextView_SubjectName = view.findViewById(R.id.tvSubjectName);
        }
    }
}
Khởi tạo RecyclerView trong Activity
Tệp MainActivity.java
package vn.edu.ntu.vidurecycleview_simpletext;

import androidx.appcompat.app.AppCompatActivity;
import androidx.recyclerview.widget.LinearLayoutManager;
import androidx.recyclerview.widget.RecyclerView;

import android.os.Bundle;

import java.util.ArrayList;

public class MainActivity extends AppCompatActivity {
    MyRecyclerViewAdapter adapter;
    @Override
    protected void onCreate(Bundle savedInstanceState) {
        super.onCreate(savedInstanceState);
        setContentView(R.layout.activity_main);
        // data to populate the RecyclerView with
        ArrayList<String> subjectNames = new ArrayList<>();
        subjectNames.add("Maths");
        subjectNames.add("Physics");
        subjectNames.add("Economics");
        subjectNames.add("C Programming");
        subjectNames.add("Java Progamming");
        // set up the RecyclerView
        RecyclerView recyclerView = findViewById(R.id.rycViewSubject);
        recyclerView.setLayoutManager(new LinearLayoutManager(this));
        adapter = new MyRecyclerViewAdapter(subjectNames);
        recyclerView.setAdapter(adapter);
    }
}
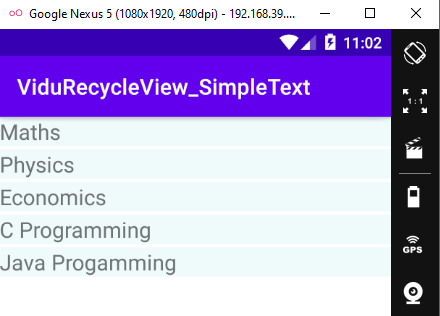
Và đây là kết quả